I’ve got loads of music MP3 files that I have gathered from various sources over the years. A lot of the music is recordings from live events and some fairly obscure stuff that isn’t available on streaming services like Spotify or Amazon Music.
I’ve tried various ways to play my music using Alexa on an Echo, but they all come with fairly big drawbacks or simply don’t work very well. I recently discovered that Synology Audio Station can integrate with Alexa and it works really well.
What Is Synology NAS and Synology Audio Station
Synology is one of the big names in the world of Network Area Storage (NAS) devices.
Originally a NAS was simply a disk \ disks that connected to a network so users could store and share files. Because a NAS was just used for storing data there was no need for lots of memory or CPU which meant that a NAS was a much cheaper option than buying a server.
A NAS is managed using a web browser, you can’t connect a keyboard, mouse, or screen directly to a NAS.
Over the years the NAS has evolved, becoming much more than a place to store and share data, although that is still at the core of what they do. The Synology NAS has numerous applications that allow for things like file synchronisation (similar to Dropbox), Media Centre, Photo Library, Web Server, and audio streaming.
The Synology audio streaming app is called Audio Station. It is this app that can be used to play your locally stored music files on Alexa.
No products found.
Pros Of Using Audio Station To Play Music On An Echo using Alexa
- Your Alexa (Echo) and music files do not need to be on the same network. For example, your music files stored on your Synology NAS located on your home network can be played in your car using Alexa on the Echo Auto.
Note: Audio Station also works with Apple’s CarPlay and also with Android Auto. - Works just like playing music from Spotify or Amazon Music using Alexa. Just have to give Alexa the voice command “ask audio station to play Katy Perry Fireworks’. If you have Katy Perry Fireworks as an MP3 Music file on Audio Station, it will begin to play. Other commands such as ‘skip’, ‘pause’ etc all work as well
- It’s Free. Well, it is kind of free. You have to buy a Synology NAS, but after that, there are no additional costs to use Audio Station with Alexa
No products found.
Cons Of Using Audio Station To Play Music On An Echo using Alexa
- You need to have a Synology NAS in order to use Audio Station. A cheap Synology NAS can be bought for under £150, plus the NAS will need at least one disk installed.
- Music from Audio Station can only be played on one Echo device at a time. You can’t, for example, play music on the sitting room Echo and bedroom Echo at the same time, It’s one or the other.
- There is a fair bit of setup required to get Audio Station working with Alexa if you don’t already have a Synology NAS. Depending on technical ability, it may take several hours.
If you already have a Synology NAS with Audio Station then it will take a lot less time, about 15 minutes
How To Set Up Audio Station To work with Alexa
As mentioned earlier in this article, you will need a Synology NAS to use Audio Station. Synology Audio Station app can not be installed on any device other than a Synology NAS.
No products found.
Setting Up Audio Station
I won’t go into any detail on how to install and configure Audio Station as Synology has a good article explaining how to do this
Configuring Audio Station To Work With Alexa
Once Audio Station has been installed on your Synology NAS, follow the steps below to get it working with Alexa.
Note: Before completing the steps below make sure the Synology NAS operating system (DSM) and all the installed packages are updated to the latest versions.
STEP 1 – Synology DDNS service
To be able to access a Synology NAS from the internet a domain name needs to be configured. Synology has a free DDNS service that can be used to set up a domain name for your Synology NAS.
The Synology guide for setting up DDNS can be found on the Synology Knowledgebase
Make sure to use the Synology DDNS service and also get a Let’s Encrypt certificate, as described in the article.
STEP 2 – Enable Alexa service
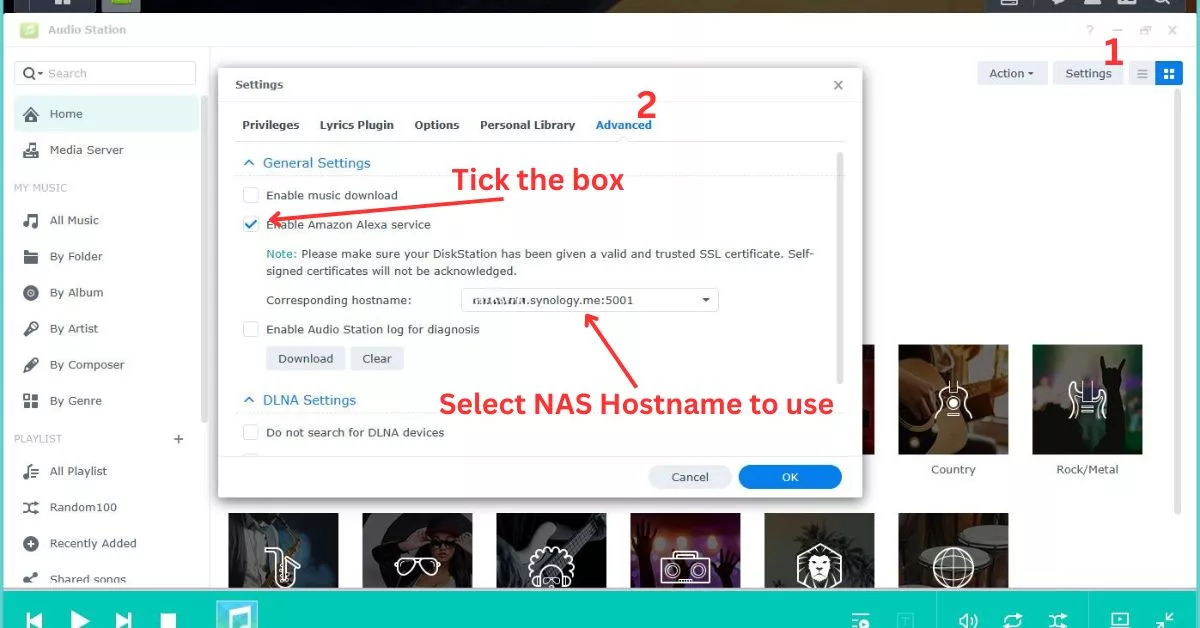
Launch Synology Audio Station, select ‘Settings‘ (top right), and click ‘Advanced‘.
In the advanced window put a tick in the box next to ‘Enable Amazon Alexa Service’ and select the domain that you set up earlier from the drop-down box.
STEP 3 – Configure Router Firewall
Step 1 and Step 2 have prepared your Synology NAS for access from the internet. However, your broadband router will be preventing access to the Synology NAS from the internet
No products found.
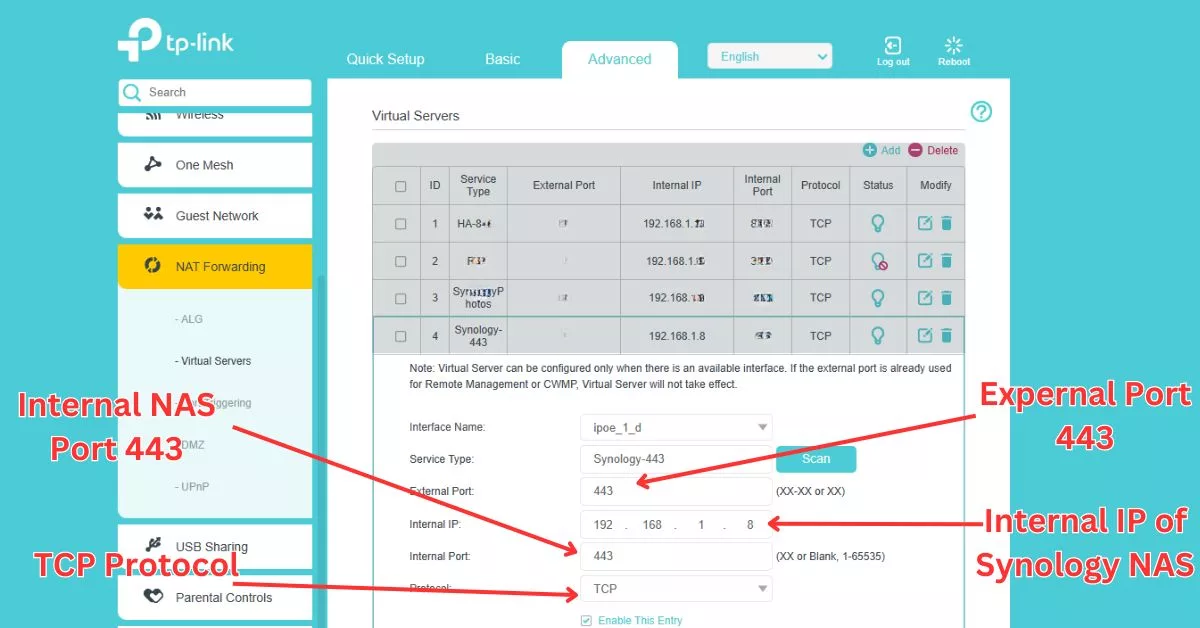
The router needs to be configured to allow traffic on port 443 to access your NAS. Unfortunately, all broadband routers are different and the way that this is achieved will vary. The best thing is to the support pages for your particular router model and look for information on how to open ports.
Below is an image of my router (TP-link Archer VR) settings that enable internet access to my Synology NAS. Your router will have something that looks similar
STEP 4 – Enable Audio Station Skill On Alexa
- Open the Amazon Alexa app on your smartphone
- Go to the Skills section, and search for Audio Station
- Tap or click on Enable for Audio Station to start the account linking
- Enter the hostname domain address of your Synology NAS that you set up earlier
- Enter your username and password for your Synology NAS.
Once successfully connected you can use voice commands to play music from Audio Station using Alexa.
All Alexa commands to play Audio station music start ‘alexa, ask audio station ……’
For some reason, the Synology Audio Station has received a lot of negative reviews. I’m not sure why, I have been using the Alexa Audio Station skill for a while and have not experienced any problems.
Conclusion: Using Synology Audio Station To Play Music On Alexa
There was a time when it was possible to upload your own music files to streaming services like Spotify and Amazon Music. Which made it possible to stream your own music files using Alexa. Unfortunately, the big audio streaming services no longer offer the option of uploading music files.
Of course, it is possible to stream music directly to an Echo speaker using Bluetooth, but that’s not always convenient. There are also other 3rd party services, but they either cost or have serious limitations.
I have found Synology Audio Station to be the best way to stream your own music files using Alexa. Using Audio Station is a very similar experience to using Spotify or Amazon Music to stream music.
The main downside is that if you don’t already have a Synology NAS there is going to be a cost in buying one and also it will take some time to get Audio Station configured to work with Alexa……..I think it is worth it
No products found.

