NordVPN is a very popular VPN service provider. One of the benefits of using NordVPN is that it allows a VPN to be set up on a router. Allowing any device to connect to the internet via NordVPN without having to install software. This means devices like Smart TV’s that you can’t install VPN Software on can use a VPN to access streaming services in other countries.
Which Router Can Be Used With NordVPN
It is very unlikely that the router provided by your Internet Service Provider (ISP) can be used. In the UK most ISP routers are fairly basic and can’t be configured with a VPN.
The router I’m using for my NordVPN is a GL.iNet Mango v2 router. It is a cheap, small travel router that has proved very reliable and easy to configure. The Mango router doesn’t replace my home broadband router. In fact I have made not changes at all to my home router.
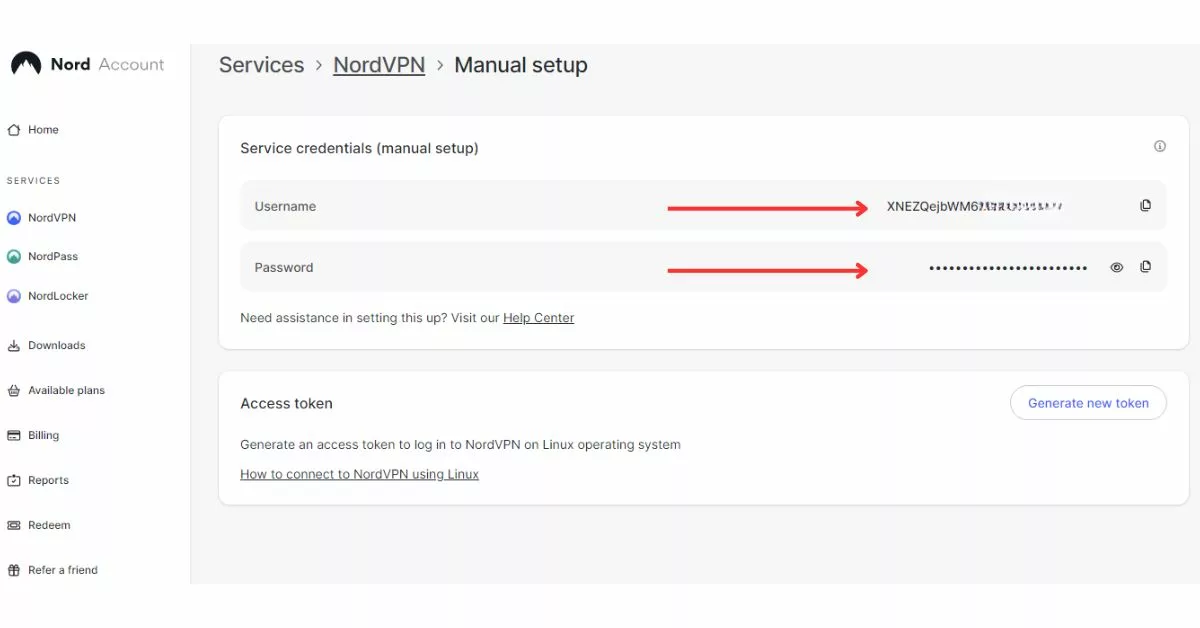
NordVPN Username And Password To Use With Router
Important: The username and password required to set up NordVPN on a router is NOT your normal NordVPN username and password!
To get the correct username and password for a router setup, do the following:
- Login to your NordVPN account
- Under ‘Services’ (on the left) select ‘NordVPN’
- Then select ‘Set up NordVPN Manually’
- The next screen will display a ‘Username’ and ‘Password’ to use with your router, see image below
Setting Up A GL.iNet Router With NordVPN
Network Design
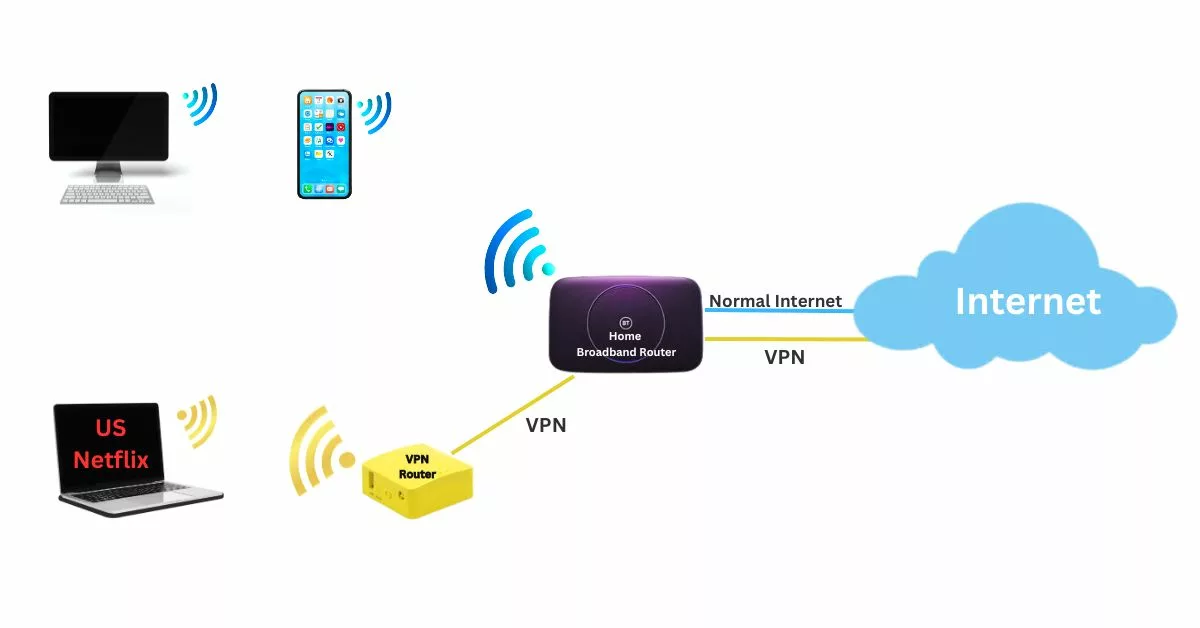
The diagram below shows how I’ve set up my home network with NordVPN.
Basically, all I’ve done is add a new router configured with NordVPN and created a WiFi network on the new router to which devices wanting VPN access connect. I haven’t made any changes to my existing home network, so everything will continue to work as normal.
The new VPN router has a network cable plugged into my broadband router for internet access.
Router Configuration Steps
The set-up steps below are for a GL.iNet Mango v2 router. However, the process will be very similar for any router that has VPN capabilities.
- Login to the router as an administrator (Gl.iNet default IP http://192.168.8.1 )
- Left side menu under ‘VPN’, select ‘VPN Dashboard’ and make sure that ‘Global Proxy’ is selected
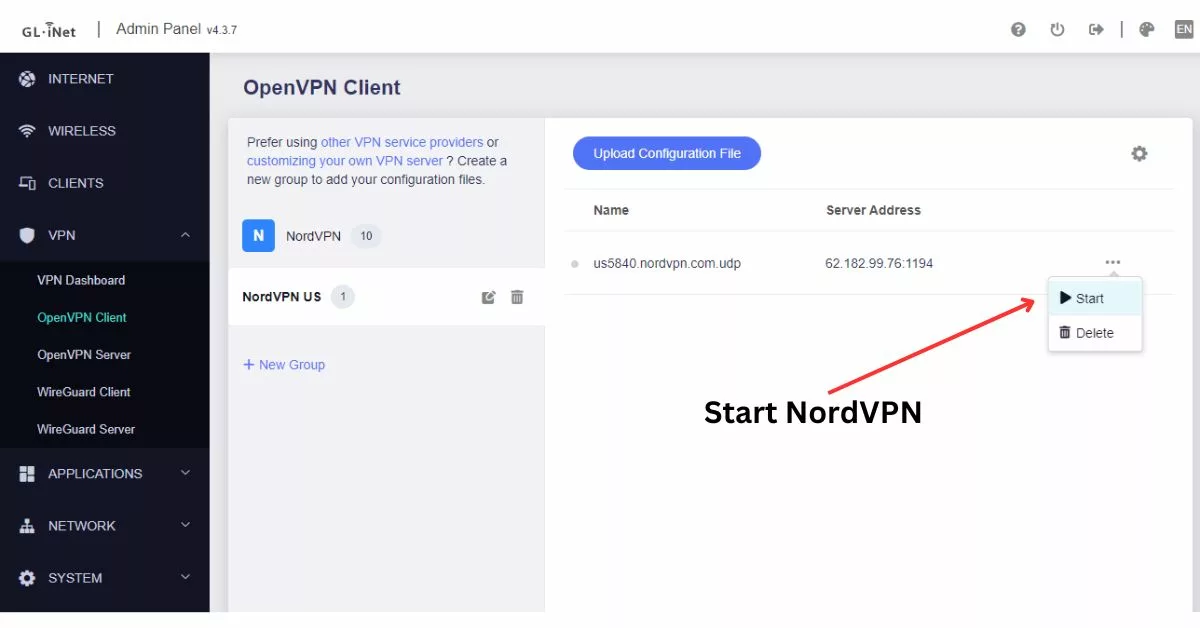
- Left side menu under ‘VPN’, select ‘OpenVPN Client’
- Click ‘New Group’ and enter a friendly name e.g. ‘NordVPN’
- Go to the NordVPN website https://nordvpn.com/servers/tools/
- Select the country from the drop-down box that you want the VPN
- Under the recommended server, click on ‘Show Available Protocols’
- Download the ‘OpenVPN UDP’ config file
- Go back to the router OpenVPN administration page and upload the OpenVPN UDP config file
- Enter the NordVPN username & password used for routers, NOT your NordVPN account password. Click ‘Apply’
- Click the 3 dots menu and ‘Start’
How To Test The VPN Is Working
Once the VPN has been set up on the router, it is a good idea to make sure that it’s working.
With the VPN off, go to Just A Bloke Whats My IP and take note of the ‘IP’, ‘Location’ and ‘ISP’. Now, turn on the VPN and refresh the Whats My IP webpage. It should now show a different ‘IP’, ‘Location’ and ‘ISP’.
Benefits of Setting Up NordVPN On A Router
Installing NordVPN on a router offers several benefits that enhance online security, privacy, and user experience for all devices connected to the network. Here are some of the key advantages:
Network-wide Security and Privacy – When a VPN is installed on a router, it encrypts all internet traffic from every device connected to that router, without the need to install VPN software on each device.
Simplified Management – With the VPN running directly on a router, you don’t need to manage connections on each of your devices separately. Once it’s set up on the router, all devices are automatically protected and routed through the VPN.
Unlimited Device Coverage – Most VPN services limit the number of simultaneous connections per account. For example, NordVPN allows a maximum of 6 connections. By installing the VPN on your router, you can bypass these limits since the router counts as just one connection, but it covers all devices connected to your home network.
Access Geo-restricted Content – A VPN can mask your IP address and make it appear as if you are accessing the internet from a different location. This is particularly useful for accessing geo-blocked content or services (e.g. US Netflix from the UK) on devices that VPN software can’t be installed, such as smart TVs or gaming consoles.
Bypass ISP Logging – A VPN bypasses your Internet Service Provider (ISP) from tracking your browsing activities.
Negatives of Setting Up NordVPN On A Router
Here are the main negatives associated with setting up a VPN on a router:
Setup Process: Installing a VPN on a router can be more complex than installing it directly on devices. It requires an understanding of network settings.
Router Performance: VPN encryption requires processing power. Older or less powerful routers may struggle to handle the encryption demands of a VPN, leading to slower internet speeds.
Limited Flexibility: With a VPN configured on your router, all your traffic is routed through the VPN server. This means you can’t easily switch between VPN servers or turn off the VPN for specific devices without changing the router settings.
Router Compatibility: Most routers supplied by UK internet service providers do not have VPN capability. This means you will have to buy a router that supports VPNs.
Conclusion: NordVPN Router Setup Guide
Setting up NordVPN on a router is a fairly straightforward process that only requires minimal IT skills. Any device that connects to the router will now access the internet using the NordVPN.
The best setup for most situations is to have a separate router that has a VPN configured and keep your existing ISP router for internet access without using a VPN.


